Thursday, January 03, 2008

Zoomify in Photoshop

Zoomify

Have you ever wanted to put a high-resolution photo on the web so that users could see the little details?
Browsers now resize images to fit in the browser window. This eliminates the scrolling we used to do, but trying to zoom in and navigate around to see what you want can be a challenge. Also, very large images may take some time to display.

Photoshop CS3 to the rescue!
Photoshop comes with a new feature called Zoomify allowing you to use high-quality photos with the ability to zoom and pan interactively in a flash based environment. This technology is also useful if you don’t want people to download a high quality version of your photograph.

How does Zoomify work?
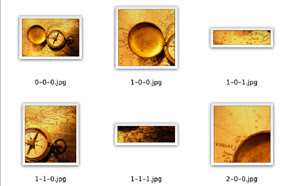
Zoomify slices up your image into small sections or tiles and places them in a folder named TileGroup. What’s neat about this is that you won’t have to wait for the entire image to download. These tiles download separately.
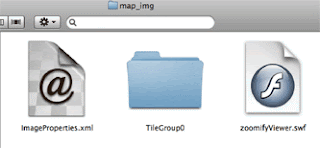
Zoomify also creates a HTML file that contains all the code needed, XML file, Flash file, and a folder containing your tiled images.You need to keep these files together as they were placed in the folder that was created. The folder created for me used the file name of my image to create a folder named map_img. My map.html file is located just outside this folder
Click here to see my example I created.When I exported my image I selected to use the optional navigation box, which displays in the upper left corner.

To zoom you just click on the image or use the navigation tools provided at the bottom of the image. Your picture could display a moment at a low resolution then redraw at the final high quality resolution showing all of the details of the image.

What a great way to share high resolution photographs on the web!

For instructions on using Zoomify, click here.

Wednesday, January 02, 2008

Free online photo sharing and storage

Share your holiday photos online!

If you have a digital camera, it’s very likely that you took a lot of photos during the holidays. How can you easily share your favorite photos?
How about a free online photo storage and sharing site?
If it’s free, what’s the catch? Usually it’s nothing more than limits on file size, having to put up with advertisements, or having your account removed if it isn’t used within a certain amount of time.
There are several sites that offer online photo sharing. All you need to do is to create an account for yourself.
Here’s a list of “free sites” along with the their “catch”.

Flickr
http://www.flickr.com/
“catch” - account deleted after 90 days of inactivity

Shutterfly
http://www.shutterfly.com
“catch” - ads encouraging you to buy calendars, prints and other products

Snapfish
http://snapfish.com
“catch” - need to make one online purchase a year or account is deleted

Kodak Gallery
http://www.kodakgallery.com/Welcome.jsp
“catch” - need to make one online purchase a year or account is deleted

Tuesday, December 18, 2007

I'm out of gift tags!!
With all chaos during this holiday season, did you forget the gift tags? Not a problem.
Just go to the following site to create custom gift tags! You’ll find themes for any occasion and be able to print them right on your printer and from the comfort of your home.
Merry Christmas!
http://www.dltk-cards.com/tags/tag2.asp

Tuesday, December 11, 2007

Creating a slideshow with Photoshop
Here’s another neat tool that you probably haven’t encountered yet in Photoshop. You can create a slideshow of a folder of images right out of Photoshop! If that isn’t a surprise enough, the results are a single PDF file that can be shared with virtually anyone.
One of the automated features in Photoshop allows you to create a wonderful slideshow in just a matter of moments. How cool is it to be able to send one complete PDF file to someone instead of a bunch of individual images!
Check under the “File” “Automate” menu for “PDF Presentation”. Some of the options available include slide titles, transitions, and note annotations.
Here is a simple example of a PDF Presentation that includes adding some metadata, annotation notes and audio annotation.
Not only is this so much faster than creating a PowerPoint file, but the PDF format is a universal format that you can share with colleagues, family or friends.
What a great way to share holiday photos!
For a detailed instruction guide on creating a PDF Presentation click here.

Tuesday, December 04, 2007

Like to save money?
Just in time for the holidays, here is a gift for you!
Google map now lets you print your own coupons and provides a map to the business offering the coupon. What's best is, all you need to do is type in your city and state for all the local businesses that are participating.
For example, here is a link for Lincoln. Users only need to enter their city and state to access this new feature offered by Google.
For a printable handout about this and other money saving sites, download my HOLIDAY "Tips and Tricks" handout by clicking here.
Happy Holidays!

Wednesday, November 28, 2007

More Special Effects with Text

Just when you thought life couldn't get any better...here is a slick way to create Text Effects that will get noticed. Just follow these steps to add a lot of interest to your web sites, brochures or however you want to use them.
  1. Create a blank canvas by going to File, New.
  2. If creating a text banner for a webpage enter page dimensions of 700 pixels wide and 300 pixels tall. If for print, adjust the size needed in inches.
  3. Add a font with large bold type. Type in your text.
  4. Open the Styles palette if it isn't already open. Go to Windows and select Styles to open the palette.
  5. Here you will see several style options. Click on a style to see a preview of what it does to your text. Continue to do this until you find a style you prefer.
That's pretty neat. However, it gets even better!
  1. Go back to the Styles palette and click on the dropdown menu in the upper right hand corner. (see photo)
  2. A menu appears with numerous style palettes that can be added to the options you already see. These are listed on the bottom half of the menu.
  3. I selected "Text Effects" and then told Photoshop to Append these styles to the bottom of my Styles palette. This way, I can just keep adding to all the styles I might want to use.
  4. The new styles now appear on the bottom of the Styles palette.
Note: You can always reset your Styles palette back to its original state. Just return to the drop down menu in the Styles palette and select "Reset Styles..." and click"OK" to return to the default Styles that were available.

Wednesday, November 07, 2007

Pasting Images into Text

Have you ever seen a photograph that was pasted into text? This neat special effect is really quite simple to do in Photoshop or Photoshop Elements. Here are the steps you’ll need to follow.
Selecting an Image
Your image needs to be at least as large as what you want your finished text image to be. Your image can be of virtually anything you want. It could be a field of flowers, a landscape, sunset etc. Open your image into Photoshop and follow these steps:
  1. To select all of your image do a “Select – All”
  2. To copy this image into memory do “Edit – Copy”.
  3. Create a new blank canvas in Photoshop by going to “File – New” (notice that Photoshop creates a canvas size exactly the same size of the image that you copied into memory)
  4. Select the Text Tool and select a font that has bold or wide letters. In my example, I selected Impact with a font size of 180
  5. To select a letter use the Magic Wand tool and click on the first letter. Hold down your shift key and continue selecting letters until all of your letters are selected. (You’ll see the “marching ants” indicating the selection.)
  6. With all of your letters selected go to “Edit - Paste Into” (be sure not to select just Paste)
  7. Now that your picture is inside your text you can use the Move Tool to adjust how your image sits inside your text
  8. You can now add the final touch by going to “Layer – Layer Style – Bevel and Emboss”. You may also want to add a drop shadow by clicking on the Drop Shadow box. Each of these special effects can be adjusted by using the slider bars provided.
  9. You can now save your file as .jpg, .pict or whatever format needed.

For a .pdf of these instructions click here.