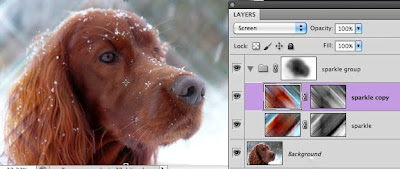
 It's that time of year when we can start expecting snow. Snow is beautiful by itself, but today I'm going to show you how to make some amazing winter photos sparkle!
Note: This tutorial is best for those familiar with layers and masks.

- Open your photograph and duplicate the layer. I called the layer sparkle
- Add a layer mask to this new layer.
- Select the layer masker then Image>Apply Image - leave the defaults and click OK. The layer mask will have a copy of the image inside it.
- Change the Blending Mode of this layer to Screen (top of the layer menu)
- Duplicate this new layer
- Click the folder icon in the bottom of the Layers palette to create a new group and call it sparkle group
- Drop these 2 layers in your group folder
- Select either one of the sparkle layers
- Filter > Blur > Motion Blur - Angle 45 degrees.
- Depending on the resolution of your image adjust the streaks until you get nice long thin lines
- Select the other sparkle layer
- Filter > Blur > Motion Blur but now select the opposite direction for streaks - Angle -45 degrees
- Again, adjust the streaks until you get long thin streaks like you did in the other layer
- Now to make the streaks more prominent go to Filter > Sharpen > Unsharp Mask
- Adjust these settings to make the streaks more visible
- Select the other sparkle layer and repeat Filter > Sharpen > Unsharp Mask
- Select the Group Layer and add a Layer Mask by clicking on the mask icon in the bottom of the layer palette
- Select a soft edged brush, set the opacity to 50% and start painting with black on the layer mask to take the streaks off the main subject
- I selected one of my sparkle layers then Image > Adjustments > Vibrance (versions before CS5 use Hue/Saturation)
- I moved the Vibrance of the image way up to make the colors pop
- I repeated this step on the other sparkle layer
Enjoy!
No comments:
Post a Comment