 It writes the image into the layer and stores it at the original resolution. You can scale it without losing resolution. It's kind of like a file hidden within a file.
In previous versions of Photoshop, the user would have to convert the Background layer to a standard layer manually or duplicate the background layer in order to apply a filter.
For those of you who have used adjustment layers, you know how valuable it is to be able to go back and adjust some photo editing you’ve done.
Let me say this about Smart Objects. A resounding ‘FINALLY’!
For those of you who have used adjustment layers, you know how valuable it is to be able to go back and adjust some photo editing you’ve done.
Let me say this about Smart Objects. A resounding ‘FINALLY’!
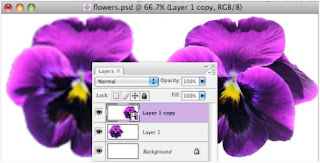
The flower on the left was sized down then sized back up losing its original quality. Photoshop doesn’t keep track of the pixels it’s throwing away when resizing down and has to guess how to add pixels back! The flower on the right was turned into a smart object, resized down then resized back non-destructively.
To create a smart object
1. Click on the layer you want to convert to a Smart Object
2. Right click on that layer and select “Convert to Smart Object”.
Or, in the File menu select Layer – Smart Objects – Convert to Smart Object.
Because Smart Objects link to an internal file, editing a smart object will edit all instances of the object.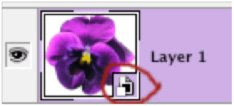 Once you’ve created a Smart Object, you’ll see a small icon in the Layers Palette indicating this item is a Smart Object.
Benefits-if it is scaled down and later you decide to scale up, the full resolution information is still available. How cool is that?!
To create a smart object
1. Click on the layer you want to convert to a Smart Object
2. Right click on that layer and select “Convert to Smart Object”.
Or, in the File menu select Layer – Smart Objects – Convert to Smart Object.
Because Smart Objects link to an internal file, editing a smart object will edit all instances of the object.
Once you’ve created a Smart Object, you’ll see a small icon in the Layers Palette indicating this item is a Smart Object.Benefits-if it is scaled down and later you decide to scale up, the full resolution information is still available. How cool is that?!
Of course, you don’t want to scale it larger than its original size or you’ll loose quality.
Editing a Smart Object
To edit a smart object right click on any smart object layer and select Edit Contents.

The embedded smart object file opens. Make any changes you want to the smart object. Click OK and Save.
In my example I want to change the hue to blue.
You can see in the Layers that 3 flowers are Smart Objects (icons in lower right) and the flower in the upper left is not a Smart Object indicated by the smart icons in the layers.
All instances of the smart object are updated when I edit the Contents of the Smart Object.
Below I had changed all 3 smart flowers to blue. What if I don't want all flowers to change?
All instances of the smart object are updated when I edit the Contents of the Smart Object.
Below I had changed all 3 smart flowers to blue. What if I don't want all flowers to change?
If you decide you don’t want a smart object to change with all the other instances, do the following. Below I've created a 5th Smart Object layer (middle flower). Here is how it is not like the rest.
Go to Layer – Smart Object – New Smart Object via Copy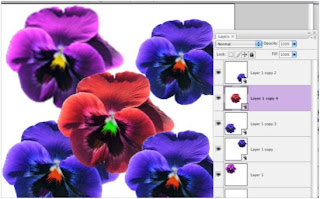
Now when I right click this red flower layer and select Edit Contents, only this layer changes and is not connected to the original smart object.
Here you can see that the red flower is still a smart object but can be edited without changing the other flowers. I now have 2 Smart objects embedded in this Photoshop file. I can change all 3 blue flowers at once or just the red flower when I Edit Contents.
Smart Filters
If you’ve assigned an object to be a Smart Object you can use Smart Filters.
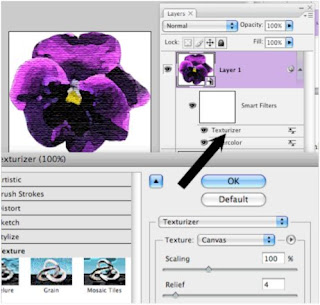 Just apply any filter to a Smart Object layer. The editable filter adjustments now appear in the layer with the Smart Object!
Click the filter name in the layer menu to edit that filter as shown.
If you’ve assigned an object to be a Smart Object you can use Smart Filters.
Just apply any filter to a Smart Object layer. The editable filter adjustments now appear in the layer with the Smart Object!Click the filter name in the layer menu to edit that filter as shown.
After applying a Smart Filter, you can now go back to tweak them as you could an adjustment layer without permanent damage to your image. Remember to always save your document as a .psd so that you can always edit your layers and Smart Objects.
I can say this for Adobe.....What a Smart feature to have!!
Here is a good video that further explains Smart Objects.
Here is a good video that further explains Smart Objects.
No comments:
Post a Comment