Hidden inside of Photoshop CS3 and Photoshop Elements is the perfect tool you need to create flawless panoramas. Making panoramas has been possible in earlier version of Photoshop but it didn’t do a tremendous job of blending images, had problems with different exposure and leaving visible seams. Photoshop’s Photomerge comes to the rescue.
Our first step is taking the photos.
Taking the photos
If you have a tripod, use it. A tripod will give you the best results. It’s difficult to hold the camera at the exact same level each time you take a photo. However, don’t worry if you don’t have a tripod. Photoshop will still give you good results if you just hand hold your camera while taking the photos. Just try to keep the camera level.
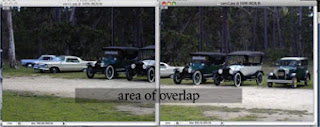
 It’s critical that you have an overlap from one photo to the next. Photoshop looks for matching shapes and blends the images together. Start on the left side of the scene when taking the first photo. The next shot you take should include some of the subject matter that was in the first photo. I like to have about 1/3 of the following photo overlap the area of the first photo. In the example below, I have almost ½ of an image overlap. Don't zoom in or out during this process, keep the camera as level as possible, and stay in the same spot.
Continue photographing to the right overlapping each photo until you reach the end of the scene. You can have 2, 3 4 or more photos for your panorama.
When you've got your series of images, it's time to fire up Photoshop CS3 (or Photoshop Elements) and make your panorama.
Making the Panorama
Why Adobe decided to put the panorama tool in different locations for Photoshop CS3 and Photoshop Elements beats me. So, here is where you find the panorama tool.
Photoshop CS3 – File – Automate - Photomerge
Photoshop Elements - File – New – Photomerge Panorama. I don’t know why Adobe needed to put this in a different spot for Elements, especially when there is an Automation Tools link under the File menu. Strangely, this link is grayed out. I guess I should be happy to have found it in Elements.

After you find and click on Photomerge, the process is the same for both.
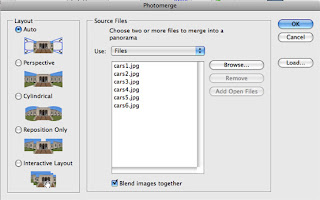
Click on the Browse button to open your photographs
You’ll have several options for Layout. I use Auto because it takes care of everything. Feel free to try the others. I’ve needed to use the Interactive Layout to manually move images when Photoshop didn’t place images properly. Make sure Blend images together is checked.
Click OK and Photoshop will create your panorama. Photoshop creates seamless blending by placing each photo on a separate layer and using a layer mask to hide the seams. What an improvement from the last version of Photoshop!
You’ll probably notice some spaces at the top or bottom of the photograph if you hand held the camera. This can be remedied by using the crop tool .


Keep in mind that your panoramas are not limited to horizontal images. I took this photo of Independence Hall with the same methods mentioned above. I just needed to rotate the image 90 degrees counter clockwise after it finished stitching. (Edit - Transform - Rotate) I also needed to crop the image to remove some empty places like before.
No comments:
Post a Comment